Training Zones: The simple 7-Zone Power-based System
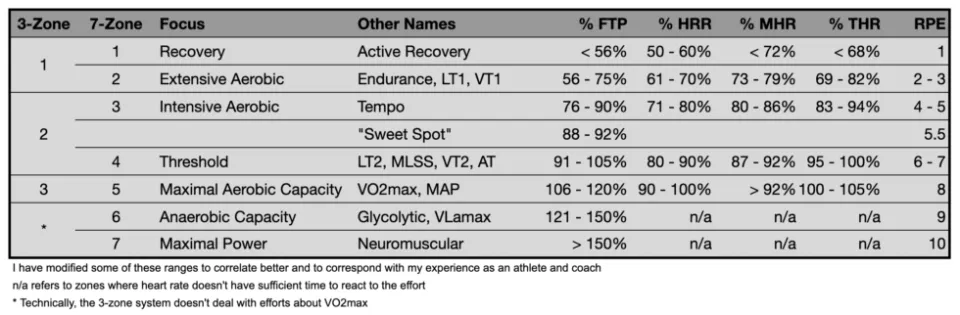
Most of us are at least somewhat familiar with training zones and how to use them to guide training. This guide describes one of the most common zone systems in use today–the 7-Zone Power-based System. The zones in this system are presented as output ranges (watts as % FTP watts) that are calculated as a percentage of a benchmark maximal effort, typically an estimate of your Functional Threshold Power (FTP).
Note that this system is "simple" in the sense that it is derived from a single metric and is therefore relatively easy to implement. Although adequate to meet most training needs, this system is based on population averages and may not represent your specific physiology. With specialized testing techniques it is possible to pinpoint the key landmarks in the underlying metabolic processes and create a customized system based on your individual physiology.
Related Articles
Zone 1 - Active Recovery
Under this system, Zone 1 refers to an intensity range classified as "Active Recovery". This is very low intensity that has minimal training effect. Recovery spins are usually confined to this zone. Similarly, you may spend time in this zone during the rest period between high intensity intervals. Athletes should be careful to not spend too much time in this zone, so-called "junk miles", as the time spent here produces minimal training effect.
A typical Zone 1 session would a recovery ride of 30 to 90 minutes in duration.
Zone 2 - Extensive Aerobic
Under this system, Zone 2 refers to an intensity range classified as "Extensive Aerobic". The "extensive" in the label refers to duration, in that the training effects of this work are achieved by spending "lots" of time at this effort level. The "aerobic" term in the label refers to the intensity, more specifically, the metabolic system that is engaged when training at this intensity. The training effect achieved by this work improves the functioning of your aerobic system (generating energy through oxidative processes while relying on fats and stored glycogen for fuel).
A typical Zone 2 session will depend on your goals and target events but would include "longer" rides 2 to 6+ hours.
Zone 3 - Intensive Aerobic
Under this system, Zone 3 refers to an intensity range classified as "Intensive Aerobic". This zone is also "aerobic" like Zone 2, however, the intensity is slightly higher and the duration of these efforts/session will generally be lower than Zone 2. In Zone 3, your working muscles groups must recruit more motor units (bundles of individual muscle fibers) to meet the demands of the effort (Type IIa fibers). The time spent in Zone 3 leads to aerobic adaptations in these Type IIa fibers which leads to an increase in overall "aerobic capacity". The practical result of these adaptations is that you will be able to produce more power aerobically and delay the point at which acute fatigue sets in and you must reduce effort.
A typical session may include blocks of Zone 3 effort embedded in "longer" Zone 2 rides, or a dedicated Zone 3 session of 1.5 - 3 hours.
Zone 4 - Threshold
Under this system, Zone 4 refers to an intensity range labelled loosely as "threshold". The "threshold" at issue is the intensity where you move from a sustainable effort to one that can only be maintained for a short period of time. As a result, all the zones above 4 have a very specific duration/intensity relationship in that sustainable duration decreases as effort increases. The theory of threshold training is that by spending time at or around this transition point, you cause physiological adaptations to the specific metabolic stresses imposed.
A typical session would include one or more blocks of Zone 4 effort of 6 - 45 minutes each.
Zone 5 - Maximal Aerobic Capacity
Under this system, Zone 5 refers to an intensity range classified as "Maximal Aerobic Capacity" (also referred to as VO2Max). This label refers to the "maximal" aerobic capacity as opposed to aerobic "endurance" that is the focus of Zone 2. Work at this intensity causes the body to mobilize ALL resources available to meet the demand: breathing and cardiac rate and output are at maximum to deliver oxygen to the muscles, muscles are taking up as much oxygen as possible from the bloodstream, and the aerobic metabolic processes in the muscles are running at peak output.
A typical session would include several blocks (intervals) of Zone 5 effort of 2 - 6 minutes each.
Zone 6 - Anaerobic Capacity
Under this system, Zone 6 refers to intensity classified as "Anaerobic Capacity". This refers to the capacity of your anaerobic or glycolytic system. A well-developed anaerobic capacity means that you can produce very high output for short periods of time (< 2 minutes). The downside of a well-developed anaerobic capacity may be that you produce more lactate (a byproduct of glycolytic metabolism correlated with fatigue) at all intensities. This would have the effect of lowering your lactate threshold and mean your power output at threshold would be decreased (all else equal).
A typical session would include several intervals of Zone 6 effort of 45 seconds to 2 minutes each.
Zone 7 - Maximal Power
Under this system, Zone 7 refers to an intensity range classified as "Maximal Power" or "Neuromuscular Power". These very short efforts (< 20 seconds) demand 100% activation of all muscular fiber units in the working muscle groups (Type I, Type IIa and Type IIx). Adaptations from this work include an increase in peak power and an increase in duration at very high power outputs. This is achieved mostly through improved recruitment and activation of the involved muscle groups.